Showing posts with label Whey. Show all posts
Showing posts with label Whey. Show all posts
How to Make Whey (aka How to Make Greek Yogurt)

So here it is.
One of the wonderful things about this recipe is that it also makes... Greek Yogurt. If you haven't discovered the joy of Greek yogurt it is my personal opinion that you haven't lived. (Just sayin'...)
How to Make Whey (or How to Make Greek Yogurt)
You Will Need:
Equipment:
- A tall bowl
- A spoon that fits across your bowl
- 90 thread Cheesecloth (where to find)
Ingredients:
- 2 cups full-fat yogurt (try and find one that does NOT have nonfat milk powder added--otherwise the Greek yogurt will be quite tart)
Yield: Makes approximately 3/4 cup whey.
To start, get out your yogurt. This is the kind I prefer:

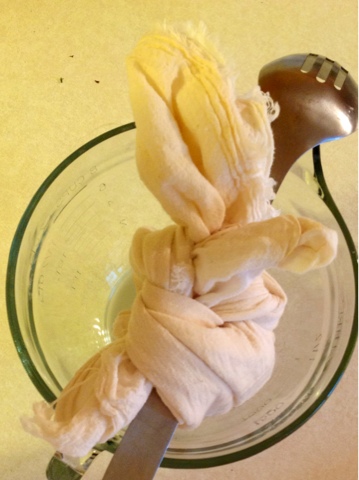
Place your cheesecloth over your bowl, like so.

Pour in your yogurt.

Place your spoon across the bowl. Tie the cheesecloth around the spoon. They whey strains out the bottom. How long you allow the yogurt to strain for will determine whether you end up with Greek yogurt or cream cheese. If you allow all the whey to strain (around 6-8 hours), you end up with cream cheese. If you only allow part, you have Greek yogurt. I wanted Greek yogurt so I left mine for around three hours. Play with it. Find what you like.
Pour the whey into a glass jar and keep in your refrigerator. Stays good "technically" for six months. (Note: I have used year-old whey and it was still good.) Use for fermenting, adding to smoothies, or mixed with water and lemon juice.

And then, of course... Mmmm... Greek yogurt. Little Owl loves this stuff, too. I have been mixing it with sweet potatoes for her.

Enjoy!
Like what you read? Be sure and follow LittleOwlCrunchyMomma on Facebook, Twitter, Instagram, Pinterest and Google+
(Note: This post might contain affiliate links. Meaning, if you shop around after clicking on them, you might be helping to support my blogging endeavors. Thank you!)
How to Cook Oatmeal the Right Way

After I gave you my recipe for Oatmeal Pancakes a couple people asked me how I prepare my oatmeal to begin with. Sorry, should have thought about that first. Before you have leftovers from making oatmeal you need to have... oatmeal.
This is how I prepare my oatmeal. This recipe is super simple, nutritious and delicious. It is borrowed from Nourishing Traditions.
Basic Oatmeal
You Will Need:
1 cup organic oats
2 tbs acidic agent (e.g., yogurt, whey, apple cider vinegar, lemon juice, kombucha, etc)
2 cups filtered water (separated)
Place oatmeal in a small bowl. Mix in 1 cup warm filtered water and 2 tbs acidic agent (I typically use yogurt). Leave in a warm place overnight.
The following morning, bring one cup water to a boil in small pan. Add in your pre-soaked oats. Cook over medium to low heat until all the water is absorbed (or to your preferred texture). Stir constantly to prevent burning.
Enjoy!
Lacto-Fermented Carrot Sticks (aka How to Make Store-bought Winter Carrots Actually Taste Good)
Be sure and check out our GIVEAWAY while you're here.

I love carrots in all forms. Carrot salad. Carrot cake. Carrot soup. Carrot bread. Carrot cookies. Carrot juice. Farm fresh carrots.
Okay, maybe not all forms of carrots. I can't stand store-bought carrots this time of year in the PNW. Frankly put, they are gross. They are flavorless at best and tasteless at worst. Throughout the rest of the year I can get them at farmer's markets and just snack on them. But this time of year, I typically avoid buying them from the store at all. That is until I discovered how to lacto-ferment carrots. Now, even the not-so-great store-bought carrots taste amazing.
You should seriously consider giving this recipe a try. The measurement I have given you is for one quart-sized jar of carrots. I usually buy a bulk five pound bag but am thinking of switching to a twenty pound bag because we eat so many. You can add garlic, ginger, dill, or whatever spices or seasoning you would like. I love them just plain.
Lacto-Fermented Carrot Sticks
You Will Need:
1 lb organic carrots
1 quart mason jar (Where to buy)
1 Tbs Celtic sea salt (Where to buy)
1 Tbs active-culture whey (How to make)
(optional additions: garlic, ginger, dill, etc.)
To start, make sure you have a clean mason jar. Add 1 tbs salt to the bottom of the jar. Pour on a bit of hot water. Swirl to dissolve the salt.

Next, cut off the tops and bottoms and peel your carrots.

Cut into carrot sticks.

Rinse in a colander and drain thoroughly.

Place carrots in mason jar with salt. Add whey. Fill jar with filtered water just enough to cover over carrots about half an inch. Screw metal lid on tightly. Shake. Make sure water is still over carrots by half an inch. Leave at room temp for 3-7 days (or longer if you prefer a stronger taste) before transferring to refrigerator. Shake and serve.

Better tasting than plain store-bought carrots and better for you. Good old probiotics! Enjoy!
What's your favorite way to eat carrots?
Like what you read? Be sure and follow LittleOwlCrunchyMomma on Facebook, Twitter, Instagram, Pinterest and Google+.
(Note: this post contains affiliate links. Meaning if you shop around after purchasing them you are helping support my blogging endeavors. Thank you!)
This post shared at: Wildcrafting Wednesday, Allergy Free Wednesday, Gluten-Free Wednesdays, Home-Making Link-Up, Wellness Wednesday, Real-Food Wednesdays, Works for Me Wednesday, Penny Pinching Party, The Mommy Club, Wake Up Wednesday, Get Inspired, Wordless Wednesday, Linkn BlogsReal Food Wednesday, WFMW, Simple Meals Friday, Healing With Food Friday, Natural Family Friday. Unprocessed Fridays, Foodtastic Friday, Party Brunch Link Party
This post shared at: Wildcrafting Wednesday, Allergy Free Wednesday, Gluten-Free Wednesdays, Home-Making Link-Up, Wellness Wednesday, Real-Food Wednesdays, Works for Me Wednesday, Penny Pinching Party, The Mommy Club, Wake Up Wednesday, Get Inspired, Wordless Wednesday, Linkn BlogsReal Food Wednesday, WFMW, Simple Meals Friday, Healing With Food Friday, Natural Family Friday. Unprocessed Fridays, Foodtastic Friday, Party Brunch Link Party
Recipe: "Rainbow" Sauerkraut
This
is a bottle of vinegar. (Good, glad we got that cleared up.) And
while I love vinegar for cleaning my bathroom and
my baby,
I won't let it get anywhere near my sauerkraut.
We
are being told these days about how important it is to eat
probiotics--so we are consuming more yogurt and popping probiotic
pills. And while these are great ways to get probiotics, there are
others, too. My preferred form is sauerkraut. Traditionally,
sauerkraut (like pickled cucumbers, carrots or beets) was made with
salt and/or whey not vinegar. Vinegar pickles
(besides being less delicious) do not have any probiotics.
The
recipe I am giving you is a fun variation on traditional green
cabbage sauerkraut. (If you want a recipe for straight up sauerkraut
check out my awesome friends awesome post.)
This recipe I am giving you is an alternative-- fun, delicious,
full or good living little things, and... rainbow!
"Rainbow" Sauerkraut
You
Will Need:
1
large green cabbage
3
colored beets (I used an orange, a pink, and a purple)
2
tbs. sea salt
To
start out, make sure you have a clean, wooden cutting board and a
good sharp knife. Set the cabbage onto the cutting board.

Quarter
and core the cabbage. Next, thinly slice each quartered chunk.

Set
thinly sliced cabbage into a large bowl. Sprinkled two tablespoons
Celtic sea salt over top.

Mix
together with your hands. Set aside.

Next,
gather your delicious beets onto the cutting board.

With a handheld grater, remove the outer layer from each beet. With
a cheese grater, grate each beet individually and place in
separate bowls. Set aside.

Next,
use a heavy object (I used a potato masher) to pound the green
cabbage to release its juice. (You can alternate between letting the
cabbage sit on its own and "sweat" out the juice, or you
can pound it--either way works.)

When
the cabbage is thoroughly moistened and you are getting sprayed with
juice, it's ready to put into mason jars. Alternately layer in the
beets into separate jars mixed with green cabbage. Push down so that
the juice comes up over the top. (Note: This is important!
This fermentation process needs to be anaerobic--no air should
be touching the cabbage/beet mix. For mine I checked back about
every day or so to make sure the juice was covering the cabbage. If
it wasn't, I just pushed it back down under). Leave at room temp for
at least one week (or longer--depending on how strong you want it.)

Transfer
to cold storage. Good with sausage, soup,
salad, sandwiches---EVERYTHING! The more probiotics the merrier!
Enjoy!
And,
do all this while the baby is sleeping, of course. ;)

(Don't forget to enter our OCTOBER GIVEAWAY!)
This post featured in: LHITS, Show&Tell, Sharing Saturday, Lovely Crafty, Strut Your Stuff, Snacktime Saturday, Hello, Weekend, Link Party, Create&Inspire, OverflowingWithCreativity, NaturalLivinMamma, BarnHop, Meatless Monday, MixItUp, Monday Mania, MeltInYourMouth, Sweet Sharing, TinyTip, Fat Tuesday, Scratch Cookin', Tasty Tuesdays, Allergy Free, FarmgirlHop, Gluten Free, Healthy2Day, Real Food Wednesday
Subscribe to:
Posts (Atom)