Showing posts with label Kitchen Tips. Show all posts

Homemade Orange Vinegar

Be sure and check out our GIVEAWAY while you're here.


As parents we continually worry about the health and well being of our children. It seems it is our "birth" right. 

For me, this looks like trying (though definitely not always succeeding) to keep my home as healthy as possible for myself as well for my family. I try as best I can to feed my family nourishing food, to use minimal products on our bodies (including not washing our hair...), and to use natural cleaning products around our home....

(This is a guest post written for Homegrown & Healthy. To read the article click here.)

How to Clean the Kitchen Sink

Be sure and check out our GIVEAWAY while you're here.


Ugh. Just looking at that "before" picture makes me shudder. I can't believe I let the sink get that disgusting. I think it was mostly coffee stains, but still, no, just no. So gross. I guess the one good thing about it is that it gives you a good idea of what the natural cleaning tip I am going to share with you can do....

(This is a guest post for Sustainable Fitness. Find the article in full on her site.)

(Source: The Naturally Clean Home by Karyn Siegel Maier)

How to Make a Sourdough Starter

Be sure and check out our GIVEAWAY while you're here.


Let me start this post by saying that I am in love with my WonderMill Grain Mill. It has made such a difference in my kitchen. I have tried in the the past to make and keep up a sourdough starter, but to no avail. I am convinced that part of what made the difference this time around was using freshly milled grain.


Making and maintaining a sourdough starter is not difficult. In fact, it is quite simple to quite simple to maintain. Like any living thing in your home, it will require some attention, but the benefits (health and taste-wise) you get from taking care of it far outweigh the work it takes.


Establishing a sourdough starter couldn't be simpler. I first learned how to make a sourdough starter from reading Wardeh Harmon's book, The Complete Idiot's Guide to Fermenting Foods. It is wonderful book that has recipes for all sorts of ferments-- from sourdough to kimchi to ketchup to natural sodas to yogurt and beyond. I HIGHLY recommend it for any kitchen. I use my copy all the time. (If you are interest to learn more you can read my full review here.)


How to Make a Sourdough Starter


You Will Need:


That's it.

INSTRUCTIONS: To start, place flour and water (3/8 cup flour and 1/4 cup water) in your clean glass jar (I used a pint jar and then transferred to a quart when the starter got too large). Stir, stir, stir to incorporate oxygen. Cover with a light cloth (securing with a rubber band if necessary). Leave in a warm place overnight. 


The next morning add the same amount of water and flour again. Stir, stir, stir. 

Feed again (3/8 cup flour and 1/4 cup water) at night before you go to bed. The starter should double or triple in size between each feeding. The time it takes to grow depends on many factors-- the temperature of your house, the humidity, the quantities of bacteria and yeast in the air, etc. If your starter seems to have issues rising, take out half of the starter and add more flour and water (3/8 cup flour and 1/4 cup water).

Continue feeding (3/8 cup flour and 1/4 cup water) 1-3 three times a day. Starter should double in size between feedings. If it has trouble rising, pour out half of the starter and continue to feed. If no bubbles appear after a week of following these instructions, start over, making sure to stir, stir, stir vigorously to incorporate oxygen.

Eventually, where there was just water and flour you now have a happy, bubbly, fermented, mixture of flour, water, and wild yeasts. 


If your starter is active and bubbly, it is ready to use as soon as you have enough available to make your desired recipe and still have some left over to continue your batch of starter.


Maintaing Your Starter


Maintaining your starter is the part that can sometimes get tricky. There are many theories on how to maintain the perfect sourdough starter. Some say you should feed a starter three times a day, others say once a day. Other say a few times a week is fine. 
Some say you should remove most of the starter before you feed it, others say that is unnecessary. 

I believe a lot of the difference of opinion comes from a few personal preferences including how sour one likes their baked sourdough goods, how much time and energy one actually has to put into their starter, and what one plans on making with it.

For myself, I find that my sourdough starter is happiest if I feed it 2 times a day (once in the morning and once at night). I find that to maintain an active and bubbly starter I need to feed my starter flour and water at least once daily. Of course, the longer you let a starter go without feeding it, the more sour it will become. And as far as dumping some of the starter out before you feed it... that is entirely up to you. If you leave all the starter, just know that it will make your baked goods more tart than if you did not.


In maintaining my sourdough starter I have found that the ratio of water to flour I feed it changes dramatically over the seasons. Sometimes I feed it equal parts water and flour. At other times I feed if more flour than water, other times I feed it more water than flour. I believe that a lot of this depends on the environment-- the temperature, the humidity, the activity level in my kitchen. 


Currently, to maintain my starter I never measure the amounts of water or flour I put in. I just put in enough water and flour to make a nice paste that is not super watery nor super sticky, but somewhere in-between. I can easily pour it from the jar without having to scoop it out. 


Options for Putting Your Starter on Hold


If you need to take a break from feeding your starter for a while (either because you are sick of sourdough baked goods or because you are taking a vacation, or for whatever reason...) all you need to do is put a tight plastic lid on your mason jar and place it in the refrigerator. The sourdough will continue to ferment but much more slowly then it would out on the counter. Ideally, you would remove it about once a week, allow it to reach room temperature, discard part of the starter and then feed it. 

If you are planning on not using it for quite some time you could also place it in the freezer. Though if you do this you might want to make your starter thicker rather than thinner. 

There is also, supposedly, a third option for putting your starter on hold. According to Sandor Katz in his book The Art of Fermentation, "Legend has it that many immigrants brought their sourdoughs and other cultures dried on handkerchiefs." (234) Fascinating.

When you are ready to begin using your starter again, simply remove it from the fridge or freezer. Allow it to reach room temperature. Discard half the starter that was in the jar and then feed it. It should wake up and come back to life and begin to bubble again. If for any reason it doesn't seem to want to come back to life, you can always just make a new starter from scratch.


This is a simple and basic lesson on how to begin and maintain a sourdough starter. If you are wanting to know more, there are wonderful books available which can help you on your quest to master the art of sourdough baking. Here are a few books I would recommend:


Good luck and happy fermenting!


My sourdough starter posing with my WonderMill Grain Mill right after a feeding.

Do you have a sourdough starter? What do you enjoy making with it?

Note: A slightly different version of this post originally appeared on Grain Mill Wagon as 'How to Make a Whole Wheat Sourdough Starter'. See it here

(Disclosure: This post contains affiliate links. Meaning if you shop around on Amazon after clicking on these link you might be helping support my blogging endeavors. Many thanks.)

This post shared at: Healthy2Day, Allergy-Free Wednesday

How to Clean a Burnt Pan

Be sure and check out our GIVEAWAY while you're here.

Have you ever had that moment in your kitchen where you feel just feel like a complete idiot. (Please tell me you've had it more than once, it will make me feel a lot better about myself...) 

Well, I had one of those moments just the other night. I was making popcorn on the stove (something I've done a thousand times...) and rather than take the pan off the stove once the popping stopped... for some reason I left it on. Not for too long. But long enough. 

To do this: 


Burn the bajeebers out of my metal pan. Honestly, I feel like this picture doesn't do justice to the situation. There was smoke billowing from the pan, the fire alarm went off and even though it was freezing outside I had all the windows and doors open so we wouldn't die from the smoke. 

Classic. 

After my anger at myself had subsided and I had eaten the bit of popcorn that didn't taste like an ashtray, I rolled up my sleeves and decided to face the pan. I scrubbed and scrubbed and scrubbed and scrubbed and scrubbed and scrubbed and scrubbed and scrubbed and scrubbed and scrubbed and scrubbed and, etc, etc, and so forth. You get the picture. NOTHING came off the bottom of the pan. I believe the popcorn now thought of itself as "one" with my pan.

It was on. This was war. And I would win.

Thankfully, I have a trick up my sleeve for removing nasty burns from pans that I learned from my mom (who learned it from her sister who learned it from...). It's very helpful in situations like this.

So here it is, my trick for cleaning a burnt pan. For those moments when you feel very, very special in the kitchen. 

How to Clean a Burnt Pan


  1.  Place a decent amount of dish soap (without added water) directly on the burnt spots and scrub really well.
  2. Add hot water and scrub until lots of bubbles from.
  3. Place pan on the stove and bring the soapy water to a roaring boil. Boil until most of the water has evaporated.
  4. Allow to cool just enough so you can touch the water and pan without burning yourself, and scrape of the burnt bits with a sponge.
Works like a charm every time. 

Note: with my lovely little popcorn fiasco I had to repeat this method twice which I've never had to do before... But after I did, the pan looked like this:


Ha. I win. Better luck next time, popcorn...

The RIGHT Way to Cut a Bell Pepper

Be sure and check out our GIVEAWAY while you're here.

Maybe you are thinking, “This is silly, everyone who is anyone knows how to cut bell peppers!”

That's what I used to think.

Until I realized that for years I had been deceived. I thought I knew how to cut peppers, but in fact what I was doing was mutilating them, flinging the annoying seeds all over the kitchen and make far more of a mess than need be. Thank goodness my eyes were opened.

Now it's your turn.

If you already know how to cut peppers, have been doing it (the right way) for years, than more power to you. Go away, this post is not for you. It's for those of you who think you know (like I used to...) what your doing, but don't.

The revelation hit me when I was in line at Chipotle (yes... you found me out... sometimes I eat at Chipotles...) and watching the sous chef prep the peppers. 

This is what he did:

First, you wash your peppers. And ready your sharp knife. Next, you hold your pepper on its side and cut off about a quarter inch or so of flesh, like so:


Repeat until you have all sides removed:


Next, cut off the bottom of the cut pepper just below where the seeds start:


Next, hold your pepper by the stem and admire all those little seeds you used to mess with back when you didn't really know how to cut a pepper. 


Now triumphantly throw it away in the compost (or feed it to your chickens...).

See! Isn’t that so much easier and less messy than what you have been doing?! (Please tell me I'm not the only one who didn't know this about cutting bell peppers...)

Now enjoy eating your delicious peppers! And next time you see a friend struggling with all the seeds or trying to "core" a pepper with out cutting their hand... you can save them the trouble by teaching them the right way to cut a bell pepper!

Did you already know this about cutting bell peppers? Or have you (like me...) been cutting them wrong your whole life!?

Like what you read? Be sure and follow LittleOwlCrunchyMomma on FacebookTwitterInstagramPinterest and Google+

(Note: This post might contain affiliate links. Meaning, if you shop around after clicking on them, you might be helping to support my blogging endeavors. Thank you!)
This post shared at: Pennywise PlatterFull Plate ThursdayThe Project Stash

How to Cook Brown Rice the Right Way


Honestly, I am not biased at all. This is THE best way to enjoy brown rice. I love brown rice. I could eat it every day. I absolutely love brown rice cooked in broth, but this is by far my absolutely favorite way to eat it. Plus, because the rice is soaked, it is better for you and yours. "Taste good. Is good." As Brian would say.

This recipe is from the one and only Nourishing Traditions: The Cookbook that Challenges Politically Correct Nutrition and the Diet Dictocrats . (Don't have a copy? Why on earth not?? This book contains a wealth of nutritional information. Buy it here.)

How to Cook Brown Rice the Right Way


You Will Need: 

2 cups short-grain brown rice
4 cups warm water
1/4 cup yogurt
1 teaspoon sea salt
2-4 tablespoons butter

Soak rice in water/yogurt mixture overnight. Place in a large pot and cover. Bring to a boil. Skim. Reduce heat to lowest possible setting. Add salt and butter. Stir until melted. Cover and cook for approximately 45 minutes, or until water has evaporated. Serve warm. Enjoy! 

It is SO good. 


How to Make Whey (aka How to Make Greek Yogurt)

Be sure and check out our GIVEAWAY while you're here.

I realized after giving you recipes for fermented carrots, "rainbow" sauerkraut and instructions for how to cook oatmeal the right way, that it would be helpful to give you instructions for making your own whey (which, consequently, all of those recipes call for...).

So here it is.

One of the wonderful things about this recipe is that it also makes... Greek Yogurt. If you haven't discovered the joy of Greek yogurt it is my personal opinion that you haven't lived. (Just sayin'...)


How to Make Whey (or How to Make Greek Yogurt)


You Will Need:

Equipment:
  • A tall bowl
  • A spoon that fits across your bowl
  • 90 thread Cheesecloth (where to find)

Ingredients:

  • 2 cups full-fat yogurt (try and find one that does NOT have nonfat milk powder added--otherwise the Greek yogurt will be quite tart)

Yield: Makes approximately 3/4 cup whey.


To start, get out your yogurt. This is the kind I prefer:


Place your cheesecloth over your bowl, like so. 


Pour in your yogurt.


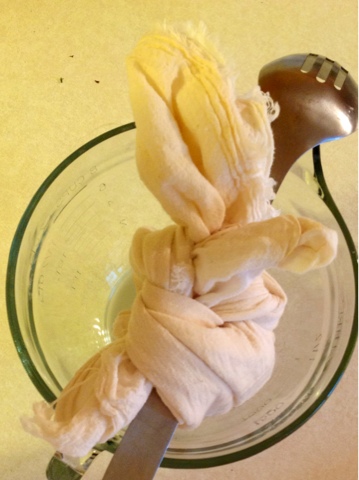
Place your spoon across the bowl. Tie the cheesecloth around the spoon. They whey strains out the bottom. How long you allow the yogurt to strain for will determine whether you end up with Greek yogurt or cream cheese. If you allow all the whey to strain (around 6-8 hours), you end up with cream cheese. If you only allow part, you have Greek yogurt. I wanted Greek yogurt so I left mine for around three hours. Play with it. Find what you like. 


Pour the whey into a  glass jar and keep in your refrigerator. Stays good "technically" for six months. (Note: I have used year-old whey and it was still good.) Use for fermenting, adding to smoothies, or mixed with water and lemon juice. 


And then, of course... Mmmm... Greek yogurt. Little Owl loves this stuff, too. I have been mixing it with sweet potatoes for her. 


Enjoy!

Like what you read? Be sure and follow LittleOwlCrunchyMomma on FacebookTwitterInstagramPinterest and Google+

(Note: This post might contain affiliate links. Meaning, if you shop around after clicking on them, you might be helping to support my blogging endeavors. Thank you!)